Somtimes hot tar is just not practical. For example a condo in a high rise building. There are other methods. Usually more expensive. I charge for time and materials in that case.
You can do the preparation yourself if you are careful, but it has to be done 100% correctly. If its not correct you are going to pay for me to make a an extra trip, plus a trip for any materials I need. If I need to install the slope or calk, the materials must dry/cure for 48 hours before I can install the waterproofing so read through this CAREFULLY.
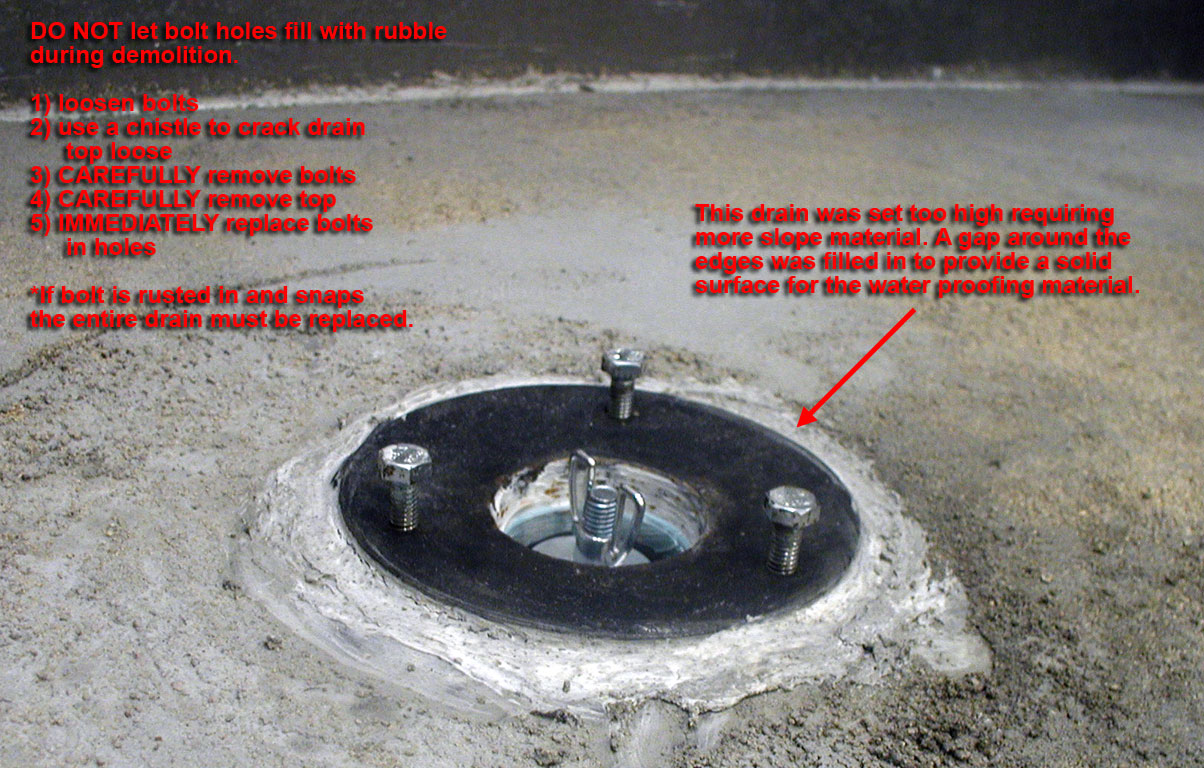
I need solid backing on the walls and floor. The floor must slope DOWN to the drain WEEP HOLES which are generally 3/16" higher than the bottom flange. Its been my experience that almost all drains are set high so there must be enough slope to compensate for a high drain. The slope must be even, smooth and solid and dried for 48 hours. NO MOISTURE can be permitted. If there is a gap in the floor around the drain it must be filled in. Here I've filled in a gap around a drain with calk which must dry 48 hours before I can apply the waterproofing material. A small preparation mistake like that can set your schedual back two days.

During demolition CARE must be take to not fill the bolt holes with rubble... often this happens and the bolts are replaced ramming material into the bolt holes. The bolt holes must be completely free of debris, and the threads must be in good shape, other wise the drain MUST be replaced. If you break a bolt during demolition you have to replace the drain.
Drains must be super clean, just like the head on a car engine. I can clean them or you can. Again I charge by the hour.

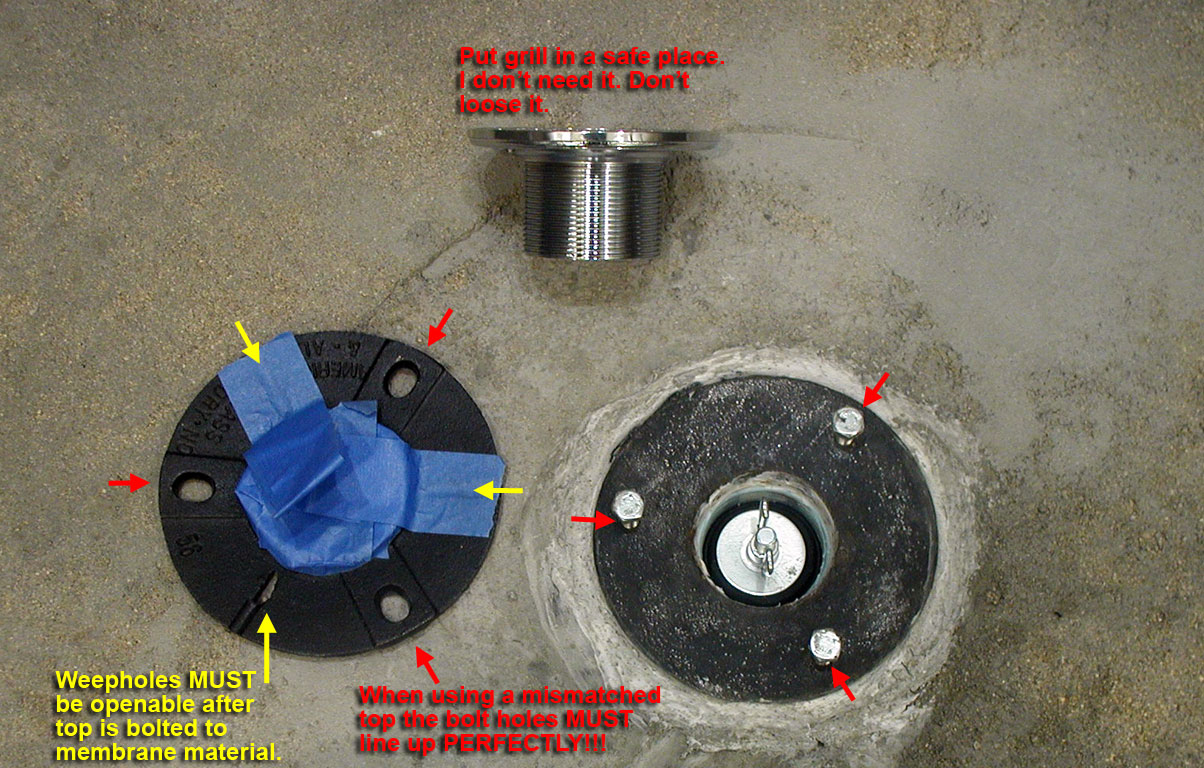
If you replace the drain TOP with a mismatched BOTTOM the bolt holes must match EXACTLY. This is critical. The weepholes must be positioned so they can be opened, in other words if they are right over the metal bottom its a dead end. In this case the lower drain flange was CONCAVE, this meant the top had to be CONVEX to fit it. A flat top would not have worked. Too risky.

I will bring several fans to blow fumes out any windows. However my capability to do this is limited. The more ventaliation the better. Cabinets and floors must be CAREFULLY PROTECTED. This cannot be done half way. Everything must be taped so that it can't slip or, in the case of plastic blow INTO the water proofing material then blow out dripping the black waterproofing material. If I have to mess with this the same hourly rate applies.
Note, on this job the contractor did an excellent job, but I still used a mixing tray, blue tape, and cardboard to prevent transferring the black waterproofing materials.

Here is the final showerpan. This material feels like a car tire after its cured. Its very tough, maybe tougher than rubber tires. Preparation is crucial for a good job. I use several trade secrets I cannot reveal here to insure a quality product. Experience is crucial, many unexpected problems can crop up, and none can be left. Note that the showerpan extends over the dam and out on the edges. In this case there was a gap between the existing tile floor and the new shower framing. A small amount of waterproofing material dripped down there. It didn't hurt anything and cleaning it up would have cost my customer extra money for no reason so I left it.
After the pan is installed, several important steps remain. Much care must be take during final clean up. After curing for a minimum of 48 hours (more is better) the shower MUST BE WATER TESTED FULL FOR 24 HOURS and inspected by the proper authority. Care must be take so that other subcontractors do not damage the final showerpan.
